Liquibase, Docker, and the art of Cohesive pipelines
In software development, there are a couple of advances in the state of the art that we call “Rachet” technologies. Once almost anyone has used them, it’s difficult to return to how you worked before.
Given how cyclical the industry is, this is a rare distinction indeed. Over the past 10 years, the items would include:
Git for source control
Containerization (I.E. Docker)
Serverless infrastructure
Modern observability tools
Automated pipelines to support continuous integration and deployment
That list may seem short, but everything else that others may consider “Rachet” technologies are generally too specific – think Kubernetes, for instance, which has made a big splash but is normally only applicable to organizations with significant scale concerns.
One technique and approach that I was sure would be implemented everywhere, for every project, the first time I encountered it was Database Source Control. After watching hundreds of deployments crash and burn because of schema drift, and thousands of expensive hours evaporate setting up local databases to develop, I got my first taste of Red Gate with one of my more advanced clients. Our team was always on the same page with what the database was supposed to look like from both a schema and data perspective, and we could reprovision or deploy to environments in seconds.
But again and again I encountered projects and teams where there was… nothing. Cost was a big concern for tools like RedGate, and if we were using anything other than Microsoft’s SQL Server we would have to use something else anyway.
Over the years I’ve helped onboard or improve the way teams work with their datastores, trying to get this critical part of any solution to work as seamlessly and quickly as the systems code that sits on top of it. In today’s blog post, I want to introduce a simple, straightforward approach that works with many database engines.
Background
First, it’s important to know that all datastore source control technologies can largely be grouped into two paradigms: State Based, and Script Based.
State Based
State Based source control works on the assumption that a version of the software you’re working on (in most cases, a Git commit) is associated with a state definition of the database. The structures contained in the datastore, such as tables/views/functions are defined there. To change the definition of these structures, you do just that. The engine underneath the source control system handles the rest.
When a deployment occurs, the source control system checks the definition of the state according to your code, and checks the definition of the state of the target you’re deploying to. It then creates a dynamic change script, before executing it against the target.
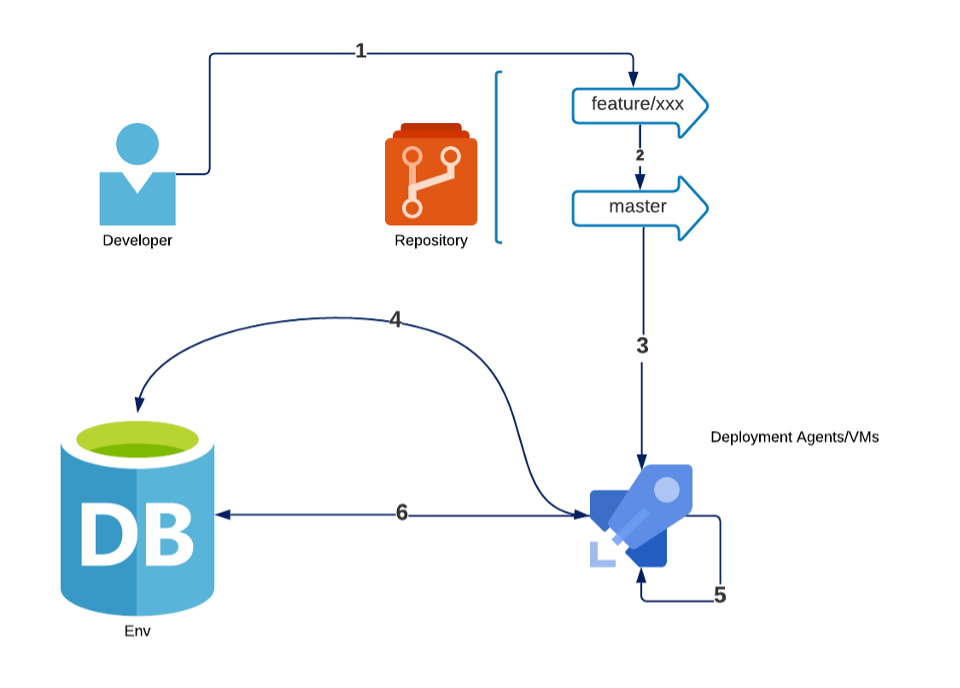
This diagram shows the steps to change a database with a state-based paradigm.
A developer changes state definitions in a non-trunk branch
They create a pull request to merge into a trunk branch
An agent retrieves the definition from the repository
It contacts a target DB to acquire its current state
It compares it with the definition state, and creates a dynamic script
It executes the dynamic script (sometimes with additional pre or post-deployment scripts).
Cons
Can cause destructive changes
Generally, takes longer to deploy
Does not work as well with huge sets of existing data
Requires the defining of indices etc. to be the same across all environments
May not exist for all database engines
Can be expensive for top-tier tooling
Pros
Few/No scripts must be created
As database “drifts” across environments, state changes are still propagated
Enforces conformance across all environments
The definition of the database shows clear changes and responsibility in source control
No dependencies on ordering and convention
Script Based
Script based source control is generally more familiar, understandable, and acceptable to teams who have been working on one project for a long time.
The premise is simple. To change the database, you create a change script and add it to the repository supporting your data store. Generally, to do this, you must conform to a naming and folder organization standard that your deployment system expects.
On deployment, A build agent pulls down your repository and is given permission to access and modify the target database. The script-based framework executes your scripts to deploy to the database. Once again, generally, there are “Meta Tables” tracking which scripts have been executed and which haven’t, to ensure it doesn’t apply the same scripts multiple times.
There are a myriad of script-based systems. They’re all drop-dead simple. You can create your own in moments with whatever scripting language your pipeline tooling supports, whether bash/powershell/python/whatever. It generally won’t have the polish or community support for common tools and approaches that do exist in this paradigm.
This diagram shows the steps to change a database with a script-based paradigm.
A developer writes a script to change the database in a non-trunk branch
They create a pull request to add into a trunk branch
They must coordinate script ordering (naming and merge priority) with other devs
An agent retrieves all scripts from the repository
It contacts a target DB and checks a “meta table” to see which scripts have not been executed
It executes any un-executed scripts
Cons
Scripts must be very carefully crafted for idempotence
May require the creation of “rollback” scripts
Allows environment drift to remain unchecked, causing undefined behavior or migrations to break in different environments
Requires use of convention and coordination across the team
Requires meta-tables or other control structure
Pros
Allows ultimate control of Database changes (if less so the database itself)
Can include data migration steps along with schema changes
Generally, faster execution times than state-based changes
Unintended destructive side-effects must be manually written by a developer
Affordable or Free – DIY solutions are not only possible but simple to build
Liquibase
Enter Liquibase – a tool that sits firmly in the middle of these paradigms. At first, Liquibase seems purely Script Based. It uses changelogs to describe major revisions of the database, each of which have 1-* Changesets. It executes the changelogs in order and keeps track of which to apply with a meta-table.
The positive kickers are threefold.
First, Changesets can describe just the state of the database that you wish it to be, which is a huge time-saving advantage.
Second, Liquibase provides that capability for dozens of database engines – 10 at last count that represent the majority of the enterprise market. This includes (but isn’t limited to) SQL Server, MySQL, MongoDB, Postgres, Oracle DB, MongoDB, and Snowflake.
Third, the state of data is also describable, not just your schema. This is generally a second-tier thought at best with other solutions, or difficult to do if your team is rolling their own.
What’s the catch? Liquibase was once a free project but has since been acquired by RedGate. The good news is that the features that cost money have generally been net-new. I also consider the documentation generally mediocre, but RedGate has been making some strides in this regard.
The Workshop
Enough exposition! Let’s briefly introduce you to what you can do with Liquibase and Docker, along with SQL Server.
This tutorial assumes you’re familiar with Git source control, Docker, and relational databases. If you understand Github’s YAML pipelines and shell scripts, that’s nice too!
First, pull down the Github repository we’ve provided for this demonstration. If you want to test out our continuous integration workflow, you’ll want to fork the repository. It has duplicate documentation as to what’s in this blog post to follow along if you wish:
https://github.com/hylaine/devopsdays-demo
(Note that the repository was created originally for a workshop I hosted at DevOps Days Raleigh in 2023 (https://devopsdays.org/events/2023-raleigh/program/ryan-mcelroy-workshop).
Looking at our repository, the very first key elements in the root folder to note are the `docker-compose.yml` file, `dockerfile`, `Instantiate.sql` and `sqlserver-entrypoint.sh`.
Run your Docker Container
To kick things off, execute `docker-compose up` from the command line in this folder. Here’s what happens:
The compose file calls the dockerfile
The dockerfile pulls down the latest SQL Server docker image and then copies in the sqlserver-entrypoint.sh and Instantiate.sql files into the container
It finally executes the entrypoint script, which in turn waits for 75 seconds before executing `Instantiate.sql`
This seems complicated and chained, probably because it is. However, it allows you to be up and running with a single command and keeps everything correctly abstracted and modifiable should it need to be in the future! It’s a neat little piece of engineering a Hylaine consultant put together for me for this talk.
Run your First Changelog
One important thing our fancy scripts did is instantiate not only the container running SQL Server but, provisioned the database that we’ll be targeting. Liquibase assumes that your database exists before you execute changelogs against it, it will not provision the DB for you. If something went wonky or your machine was lent to you by Fred Flintstone, make sure you execute `Instantiate.sql` against your container’s SQL Server instance before we move on.
Next, I suggest connecting to that database from your favorite SQL Server browser tool. This can be SSMS if you’re old-school and used to it, like me, or you can use Azure Data Studio. Ensure you can connect to it, but that there aren’t any tables in the bare DB.
Now, let’s look again at the repository – specifically the folder `changelog`. This contains two critical files: `Liquibase.properties`, which defines how Liquibase behaves in the absence of command line parameters, and `devopsdaychangelog.json`. This is the parent changelog, which is very simple and just refers to the `changelogs` folder, which is full of (you guessed it!) changelogs.
Now, from the command line, run
`docker run --rm --net="host" -v ${PWD}/changelog:/liquibase/changelog liquibase/liquibase:latest-alpine --defaults-file=/liquibase/changelog/liquibase.properties update`
You should then see a message from Liquibase saying that it executed your parent changelog and the single changelog in the `changelogs` folder.
Run your Next Changelog
Check your database again. Now you should see some basic tables and relationships defined, along with the Meta-table that Liquibase uses.
Looking at our root repository folder one more time, you’ll see two changelog files, one of which is well-formed, and one that’s ill-formed. You can experiment with putting either of these files into the `changelogs` folder and renaming it to `devopsdayschangelog-2.json`. Run the command you did above, and Liquibase will see the new changelog file to execute. It will skip the first and attempt to apply the new changelog to the database.
Build and Deploy
The last item in our repository of consequence is located at `.github/workflows/devopsdays-liquibase.yml`. This is the definition for the Continuous Integration job that runs for any pull request into our repository.
When you check out this file, you’ll see it’s doing the exact same thing that you’ve done previously in this workshop! It’s good practice in DevOps and local development to make these workflows as similar as possible.
The only additional component here is a supporting step that catches Liquibase errors and reflects them in the pipeline. If you’ve forked, you can open a Pull Request to check how it works! The brilliant part of using a docker container to host our DB is ensuring our Liquibase changelogs are always applicable to a new environment and fully tested against a live datastore engine before deployment.
Final Thoughts
This set of blog posts is just an introduction. It should go without saying that managing a larger or more intense database will be more challenging, but this approach can get you off and running in a very mature way.
What’s next though?
Data Insertion and Smoke Tests
Include data insertion as part of either CI or CD. With a fully dockerized database and some basic data, you can run rich smoke tests during integration and before deployment. Separate what we would call “Core” data (lookup table rows etc.) from “Demo” data (dummy rows that someone would want to have in a fresh local environment) into separate changelog files that execute in the correct contexts. You can execute basic smoke tests on the DB directly with DML statements, or, better yet, integrate with the whole stack for the application.
Performance Testing
Use the ability to dynamically deploy a database to update and stress a prod-like serverless database. You’ll require a more complex pipeline to “Wake Up” these instances, but it’s a great way to spend very little money on a comprehensive performance test.
Rollbacks and Complex Deployments
Your pipeline can automatically execute a rollback statement if tests fail, which is appropriate for almost all non-prod environments. You can audit and dry run changelogs before execution, test the performance of the execution of the changelog itself, and include manually written `.sql` files to be executed around migrations. Note that some of these features will require a paid license for Liquibase.
Liquibase’s Docker Container
Those of you who attended DevOps Days may notice a difference between this workshop and what I presented there. Originally, I included the Liquibase runtime in this repository. I had too much trouble getting the Docker image for Liquibase to work with the “cleanest” folder structure I wanted.
Given the downsides of including a runtime in your repo and requiring the installation of Java, I had another Hylaine consultant or two plug away at it for a couple of hours. I think we’ve vastly improved the solution’s portability at this point, but going with our original approach is valid for certain use cases!


